Create and Configure an Instance in AWS
Amazon Web Services provides virtual cloud platform and computing resources for developers and IT professionals. SoftNAS Cloud® provides a powerful shared-storage interface into this robust resource through unified connections of CIFS, NFS, iSCSI, giving the virtually unlimited capacity, remote replication, and high availability needed for the expected workload.
1. Complete the Launching SoftNAS Cloud® Platforms initial registration procedure, beginning from www.softnas.com and choose SoftNAS Cloud® for AWS.
2. Continue through the registration wizard.
3. A SoftNAS Cloud® for Amazon Marketplace pricing page will ultimately appear. Choose to Launch with 1-Click or change preferred settings in the Manual Launch page and Launch from EC2 Console.
Note: Review all pricing structure and usage fees in each section before confirming or launching an instance. Some settings will impact usage and subscription fees, even during a trial period.
Amazon defines instance as "a copy of an Amazon Machine Image running as a virtual server in the AWS cloud." This guide will use the AWS terminology in this section for UI consistency.
Manual Launch Procedure
To maximize customization, Manual Launch is the recommended choice for initial setup. Below are the basic steps to follow.
1. Launch Instance
-
Once an AWS account has been created, log on to Amazon EC2 and navigate to EC2 Dashboard.
-
Create Instance from the Launch Instance item that appears on the Dashboard as well as the Instances page.
Note: The active region is visible in the Amazon Header menu next to the access email address. This can be changed to create servers in different regions, but keep in mind budgeted subscription costs and data usage fees. Also consider permissions for different user levels at this stage.
2. Choose a SoftNAS Cloud® Amazon Machine Image (AMI)
From the menu on the left, click AWS Marketplace and search for SoftNAS.
Note: SoftNAS Cloud® supports two different virtualization types, either paravirtual (PV) or hardware virtual machine (HVM, required for Enhanced Network Support, recommended) on General Use or Enterprise Level. Choose the instance type that supports predicted network requirements.
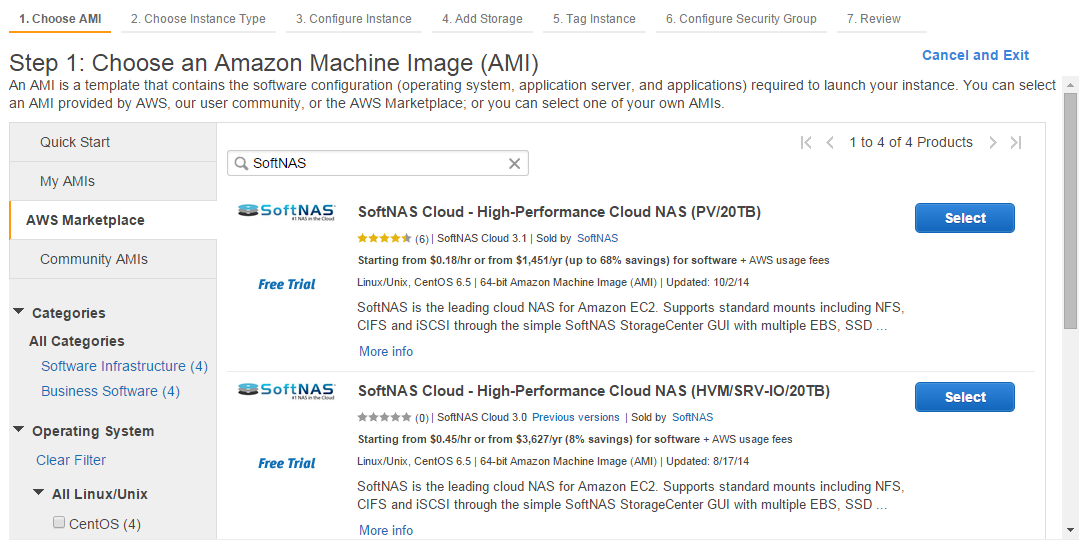
Note: Prices and version levels may have changed. Select the version that most accurately fits the needs of deployment. Click Next.
3. Choose an Instance Type
-
Tick the Instance that best fits the expected environment. Then click Next: Configure Instance Details.
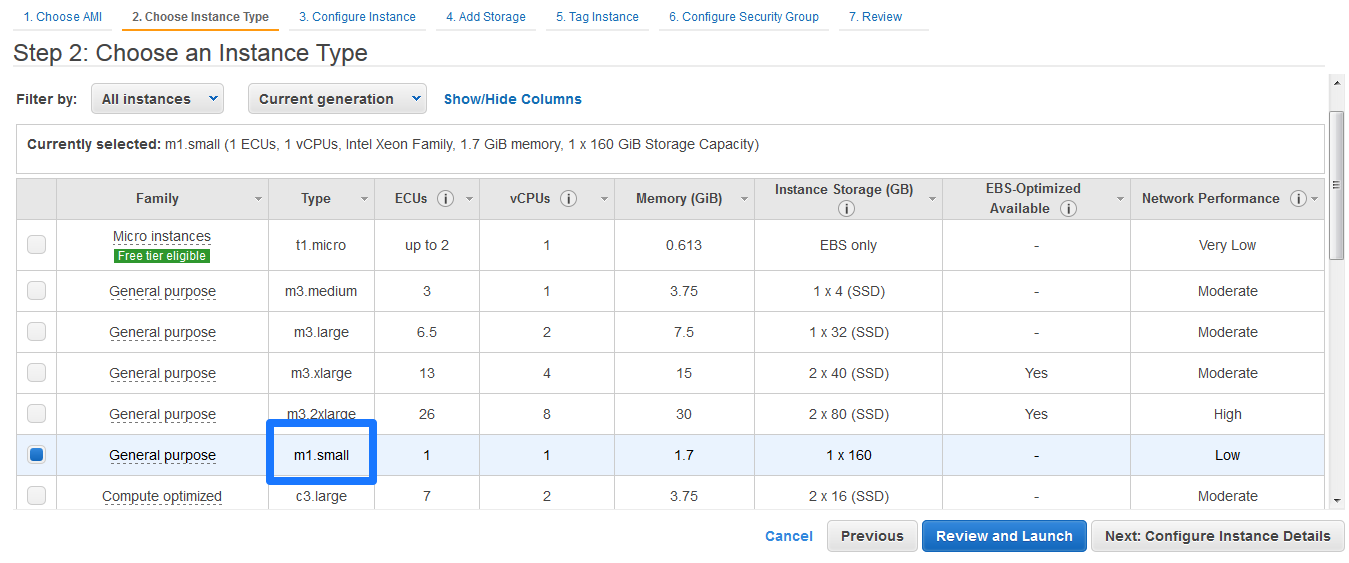
Note: At any point past this screen, skip to Review and Launch to accept the default settings for the rest of the option screens.
General Instance Types and Setup Recommendations
Consider the recommendations in section AWS Instances for a clearer network design.
Note: Micro instances may be adequate for some development and QA testing purposes, but consider the limitations on memory, CPU and network that are imposed on micro instances. These limitations have a significant impact on SoftNAS Cloud®'s performance and throughput.
View Instance Details
View the complete details of an instance that is successfully launched.
1. Click Instances in the left panel.
All the instances in the region will be displayed.
2. Select the instance for whose details are to be viewed.
The details of that instance will be displayed at the bottom of the screen in different tabs.
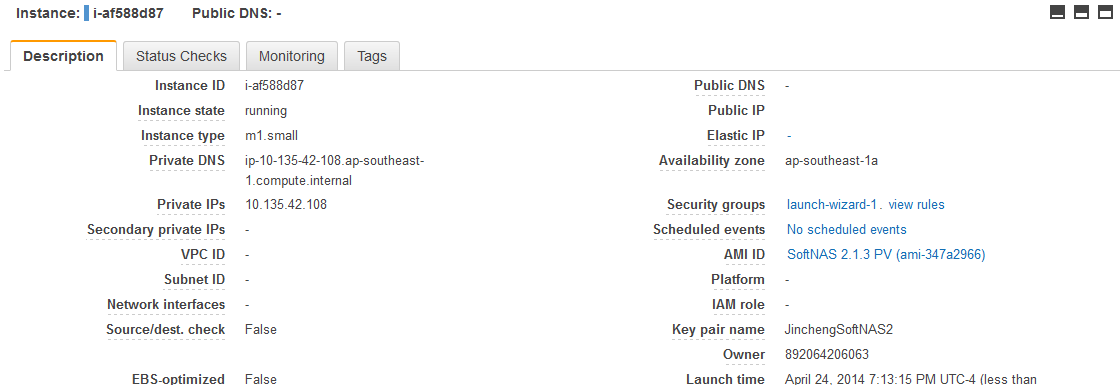
3. The Description tab shows all the basic and general information of the instance.
4. The Status Checks tab displays the information on system status checks and instance status checks. Status Check Alarms are created from here.
5. The Monitoring tab displays all the CloudWatch alarm and metrics in graph format.
6. The Tags tab will show all the tags that are associated with the instance. Add, edit or remove tags in this area.
Provide Instance Details
|
Setting
|
Recommended
|
Notes
|
|
Number of Instances
|
1
|
|
|
Network
|
EC2
|
See VPC Notes below
|
|
Availability Zone
|
No preference
|
Choose a preset zone
|
|
IAM
|
None
|
|
|
Shutdown Behavior
|
Stop
|
|
|
Enable Termination Protection
|
Checked
|
Prevent Instances from being accidentally deleted
|
|
Monitoring
|
As preferred
|
See CloudWatch notes below
|
Consider the following elements when configuring an Instance:
|
Element
|
Setup Recommendations
|
|
Memory
|
|
| |
| |
| |
|
CPU
|
|
| |
|
Network
|
|
|
VPC Notes: For optimal efficiency, launch an instance into an Amazon VPC (Virtual Private Cloud) environment instead of the default Launch Into option to EC2. VPCs can be useful if all computing will be done in the EC2 environment, or to interconnect an existing network via a VPN gateway to the VPC environment; e.g.,setting up an IPSec tunnel between an existing data center and the VPC. To operate SoftNAS Cloud® within the private subnet of a VPC, create an outbound NAT route that enables the SoftNAS Cloud® instance to access the Internet to perform software updates, activation, etc. In this case, only outbound TCP traffic to the softnas.com domain is required to be enabled; i.e., inbound access to ports 22 and 443 for administration can be restricted to VPC subnet access only.
Note: Use a VPC to use SoftNAS Cloud® in high availability mode (SNAP HATM). For more information, see the document SoftNAS High Availability Guide.
CloudWatch provides a detailed monitoring of the SoftNAS Cloud® instance. The Free Tier includes basic monitoring metrics at 5-minute intervals, 10 monitoring metrics, 10 alarms and 1 million API requests at no additional charge. Check the box in the Monitoring field to enable CloudWatch, which is recommended.
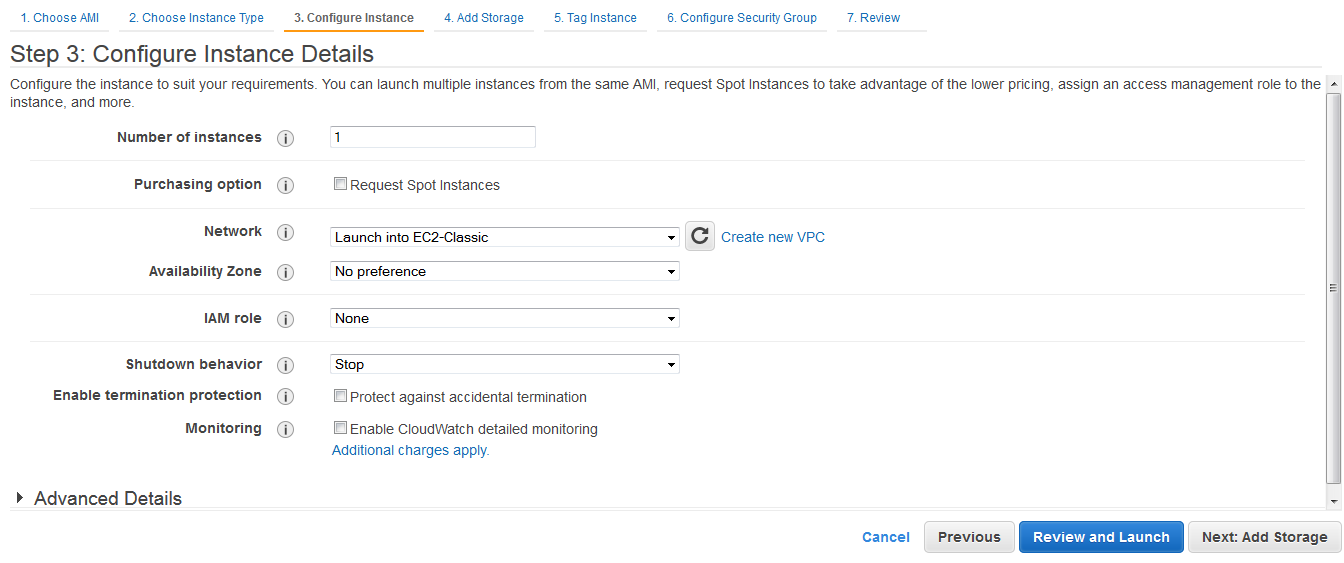
Advanced Details may also be set up in this step.
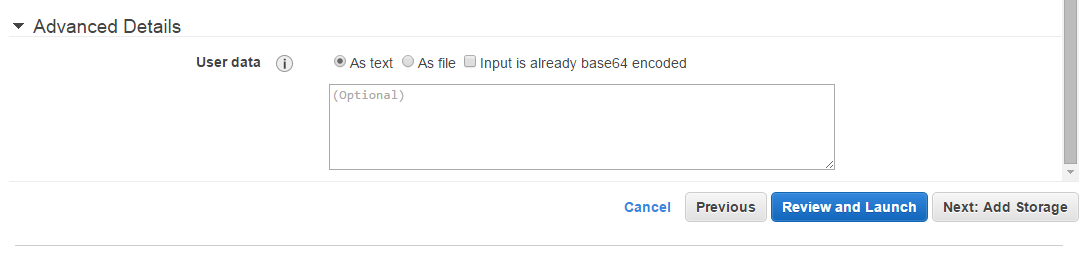
Click Next: Add Storage.
Add Storage
Attach additional EBS volumes and instance store volumes, or edit the settings of the root volume.
Note: Instance store volumes may not be attached after launching an instance; however, EBS volumes may be attached after the instance is launched. Keep this in mind during initial network planning.
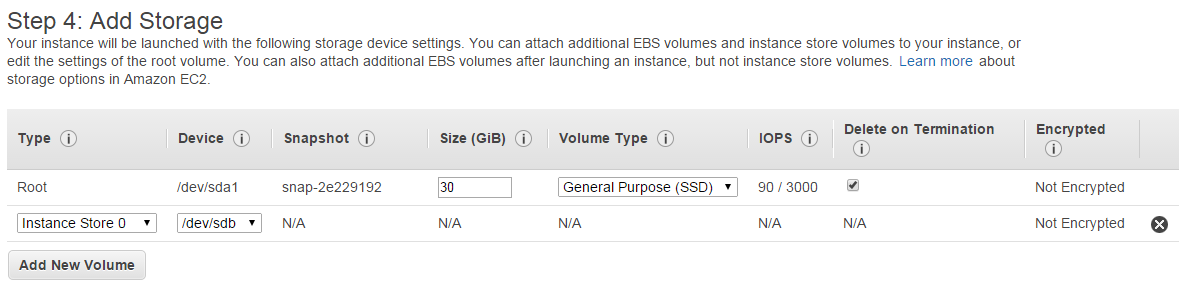
Configure Root and Instance Store
Create and configure additional volumes for SoftNAS Cloud® use. A default installation includes one SoftNAS Cloud® 30GB root device and a configurable first volume as an Instance Store.
Recommended Initial Configuration Settings:

Add More Storage
1. In the above menu, click Add New Volume.
2. Alternatively, go to Elastic Block Storage in the menu, and click Volumes.
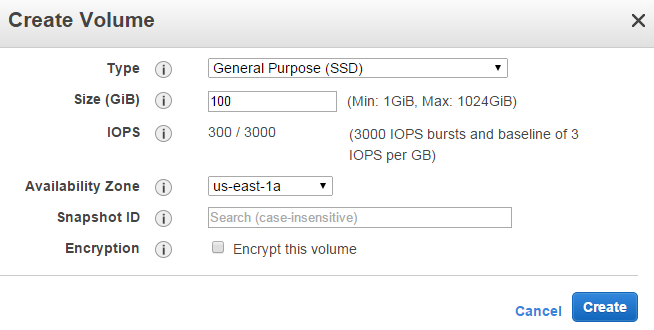
3. Enter the configuration settings best suited for an environment based on best practices and the relevant interface above.
Note: Key Pairs and Instance Tags secure data and verify ownership. Properly set up, these layers of validation protect EC2 Instances from accidental or unauthorized users.
Instance Tags
The EC2 environment takes advantage of keyword tag benefits by proactively setting a connection between an account and access to the current instance.
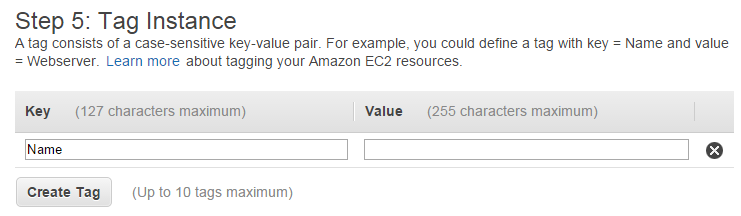
Note the following basic tag restrictions:
-
The aws: prefix is reserved for AWS use, and tags with this prefix do not count against tags per resource limit.
-
Maximum Tags: 10 tags per resource
-
Maximum Key String: 127 Unicode characters (case-sensitive)
-
Maximum Value String: 255 Unicode characters (case-sensitive)
Creating or Selecting a Security Group
Next, network settings and services can be determined in advance by setting up a Security Group.
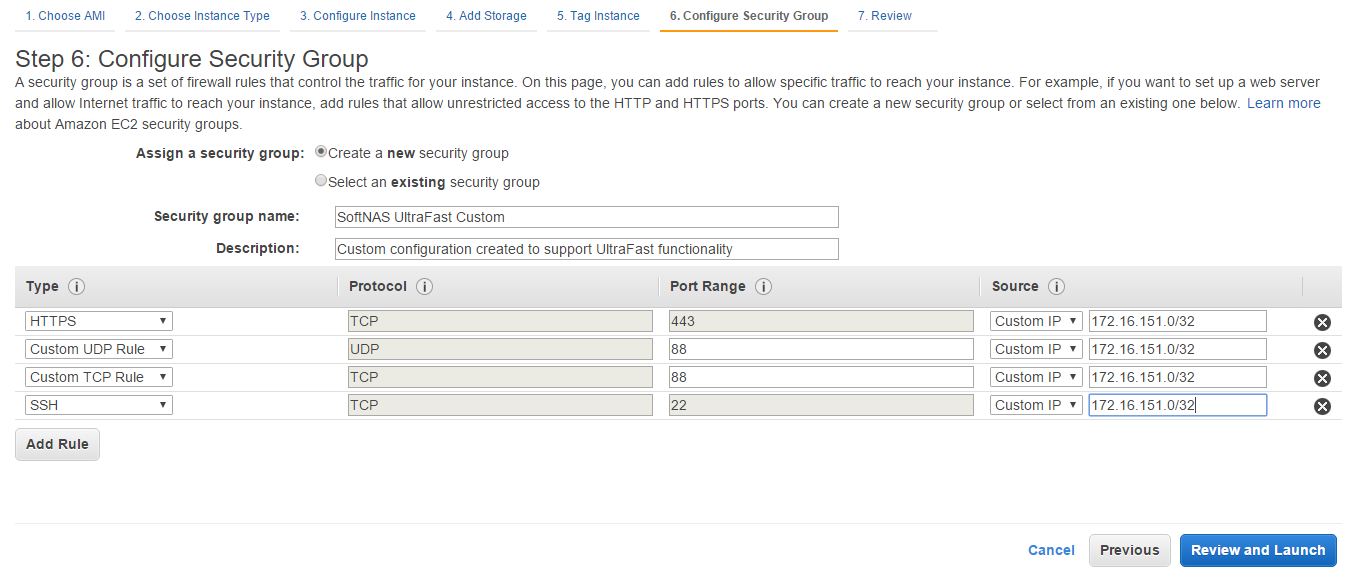
-
If creating a new security group for your instance, select the Create a new security group radio button.
-
To create a custom configuration, simply click Add Rule, and select the desired protocol, the desired port, and for improved security, place a limit on the accepted source IP.
-
To select an existing security group configuration, click the Select an existing security group radio button, and select the desired option from the dropdown that appears.
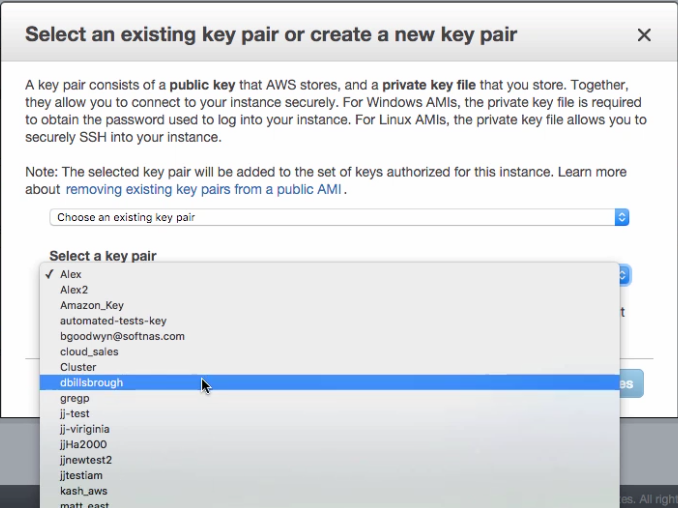
Creating a Key Pair
A Key Pair is a pair of security credentials associated with this Instance; the Public Key and the Private Key.The Create Key Pair section of the wizard will be displayed. In this step, create a public/private key pair used with SSH to access and administer the SoftNAS Cloud® instance in the cloud.
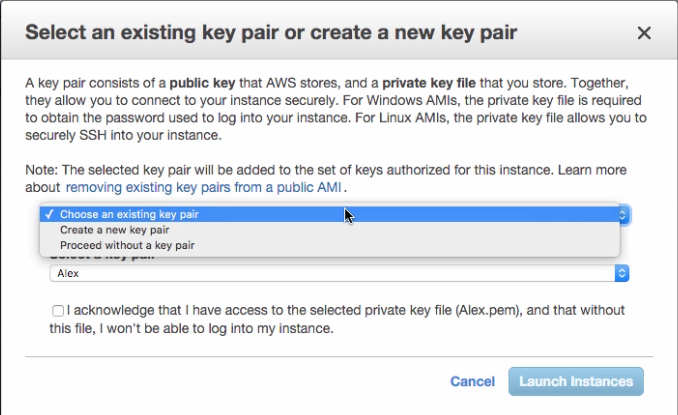
The Key Pair helps to securely connect to an instance when it is launched. Either choose from existing key pairs that have been created in the current region or create a new key pair. In the above example, the option Choose from existing Key Pairs is selected.
If choosing from existing key pairs, simply select from the available options under
If creating a key pair, simply select said option from the top dropdown.
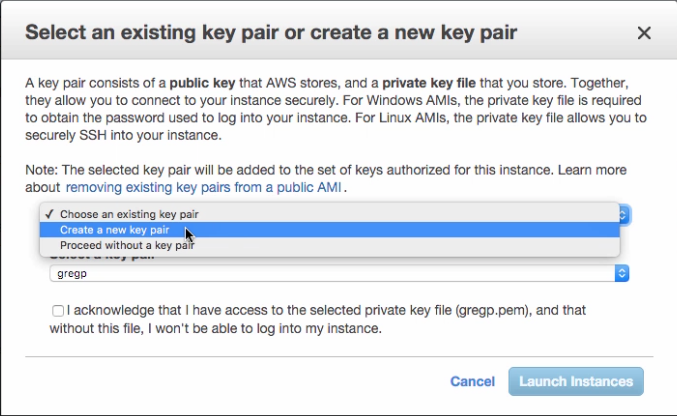
Upon clicking Create a new key pair, the following dialog appears:
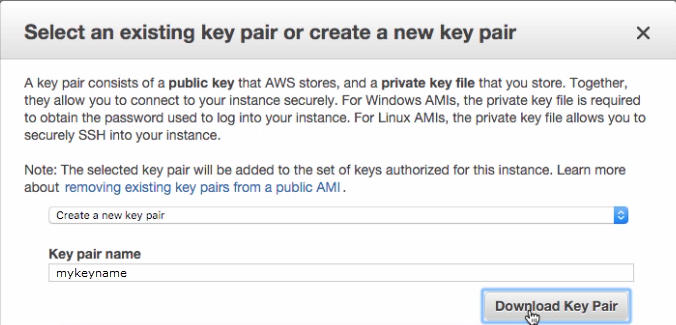
Name this key pair something that will help identify it later. Download the .pem file created, in order to gain access to your VM. As the warning below states, this will be the only opportunity to do so.

Note: Do not select the Proceed without a Key Pair option. If an instance is launched without a key pair, it will be inaccessible. This option is used only when creating an AMI, and/or when connecting to the instance is not critical.
Click on Launch Instances.