Creating a CIFS Share
Note: The easiest and recommended method for creating CIFS Shares is through Volume and LUN Create. It is also possible to create a CIFS Share through the CIFS Share option under Storage Administration. However, if using this method, exercise caution. Improper configuration can result in the inability to control the volume, and an inability to create snapshots.
The Common Internet File System (CIFS) is the standard way that computer users share files across corporate intranets and the Internet. It provides users with seamless file and print interoperability between VMs and Windows-based clients. CIFS allows multiple clients to access and update the same file while preventing conflicts by providing file sharing and file locking.
SoftNAS Cloud® uses Samba Windows File Sharing for secure, stable, and fast file sharing and print services. Samba integrates Linux/Unix Servers and Desktops into Active Directory environments using the winbind daemon.
Allocating storage and network permissions for multiple organizations and dispersed users in branch offices or on a corporate network can be complicated. It is common practice to organize users into groups to provide specific permissions when accessing data. For this reason, the settings of Shares, Users and Groups are closely related in the CIFS Shares section of SoftNAS’ Storage Administration.
If networking, users, and groups have already been configured for your deployment, the only requirement to make your CIFS Share available is to create one and assign the appropriate permissions. Otherwise Windows Networking and Authentication will need to be configured. In order to assist you, the steps to configure Windows Networking and Authentication are included after "Creating a New CIFS Share".
Creating a New CIFS Share
1. On the CIFS Shares panel, click the Create a New File Share link.
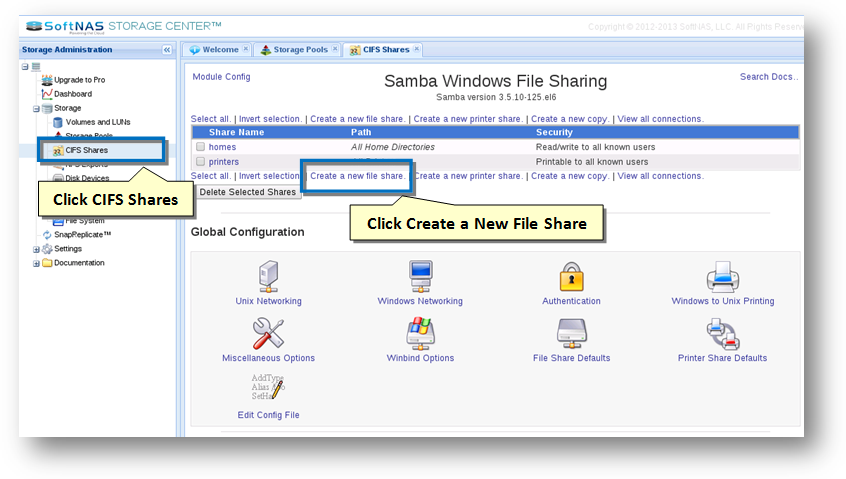
The Create File Share section of the panel will be displayed.
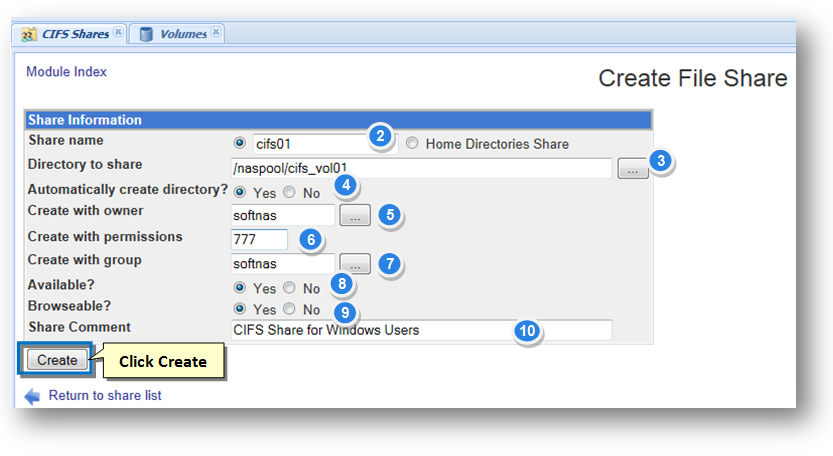
2. For most use cases, select the first radio button. Enter a unique alphanumeric name for the share (such as 'documents1') in the Share Name text entry box. This name will appear as the network mount point.
Note: If you enter the name of a Unix user, his automatic home directory share will be overridden.
3. The Directory to share is the path to the Volume that was created in 'Volumes and LUNs'. Click Browse to select the Volume from the filesystem for sharing. Click OK once the desired volume is selected.
Note: Make sure you select the volume and not just the pool, to be associated with the CIFS Share being created. Failure to do this will cause the ability to manage the volume under SoftNAS’ Volume and LUNS to be lost. This also means Snapshots will be disabled for the volume.
4. Set the Automatically Create Directory field option to Yes.
5. The Create with Owner field determines which Linux user will be assigned to the shared folder. This will also be the username required to use the CIFS Share on the Windows client.
6. Enter the permission mask in the Create with Permissions text entry box. The permissions can be set for the owner, group, and all other users. The leftmost digit is used for the owner, with the center digit specifying the group, and the rightmost is for all other users. Each permission has a predetermined value:
-
Read = 4
-
Write = 2
-
Execute = 1Adding the permission values together establishes the specific permission level for the owner of the file/directory, group of users, and all other users. For example: 777 is read/write/execute for the owner, group and all users.
7. The Create with Group field determines which Linux group will be assigned to the shared folder.
8. To make the share available on the network, check the Yes option in the Available field. Setting this field to NO is useful if you want to temporarily take it offline until all the options have been configured. You will need to change the option to Yes to make the share available to the Windows client.
9. To make the share browseable on the network, check the Yes option in the Browseable field. Setting this option to NO will hide the share from the list of shares when this Node is browsed. However, it can still be directly accessed using a \\servername\sharename path.
10. Enter a comment (if applicable) that will display to users who browse the share, in the Share Comment text entry box. Adding a short description is helpful to quickly identify the purpose/use of the share, for example "Personnel documents".
11. Click Create.
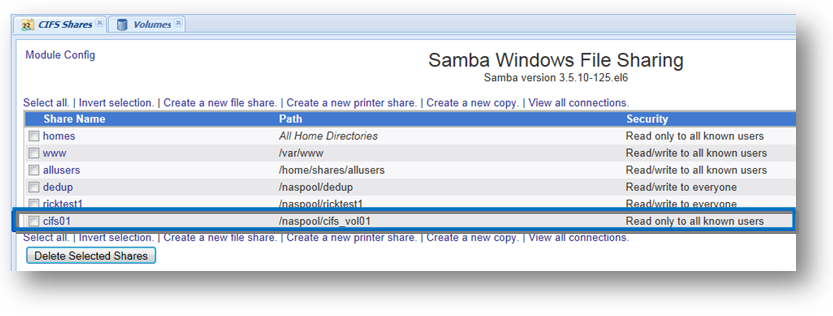
The new file share will be created and published for access by Windows servers and clients.
Verifying Access to the CIFS Share
1. To verify access to the CIFS share, navigate to Windows System > Windows Explorer.
2. Enter the UNC path of the SoftNAS Cloud® server (or the DNS hostname if one has been assigned to SoftNAS Cloud®).
3. Click on the Share icon and verify access permissions are set correctly from the Windows perspective.
4. Create a folder or text file and then right-click on the file/folder to verify that the Security permissions are as expected.
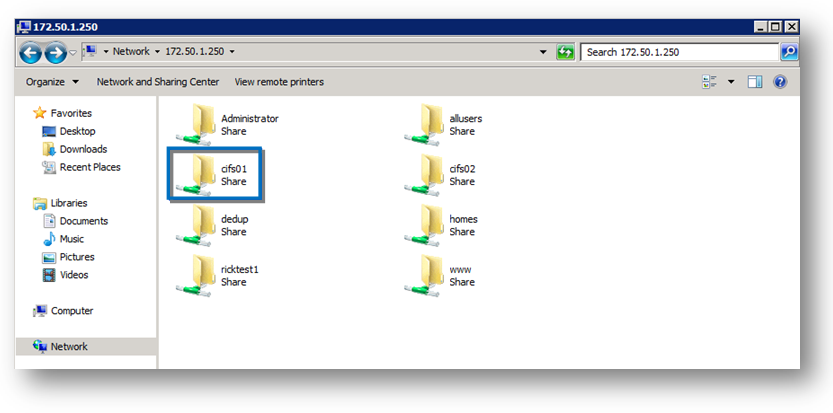
The CIFS share that was created is now available and ready for use.
Note: If you use the File Share Defaults to set defaults for all shares, there is no need to configure settings for each share unless specific CIFS Shares require unique access permissions.
Configuring Windows Networking Settings
1. Log on to SoftNAS StorageCenter.
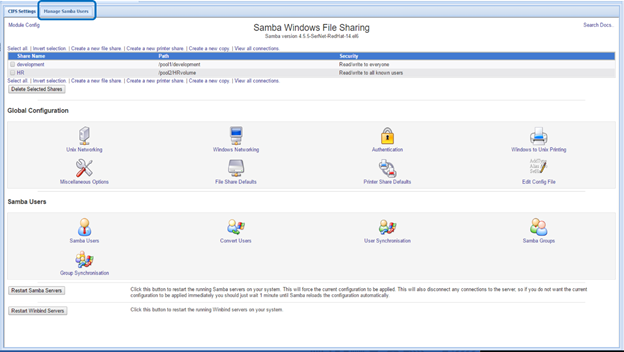
2. In the Left Navigation Pane, select the CIFS option under the Storage section.
The CIFS Shares panel will be displayed. From here, configure and manage CIFS sharing.

3. Click the Windows Networking icon in the Global Configuration section.
Note: Any configuration settings applied under the Global Configuration section applies to all the CIFS Shares managed by this server.
The Windows Networking Options dialog will be displayed.
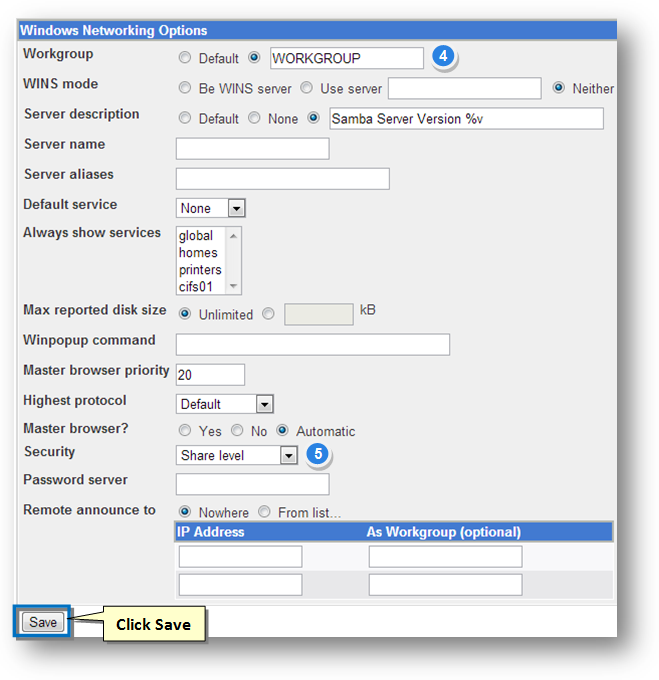
4. Set the name of the workgroup in the Workgroup field. This setting should be appropriate to the planned environment. It should match a Windows workgroup or domain environment. To set a workgroup for your server, select the second radio button in the Workgroup field and enter a short name into the text box next to it. If your network already has a few SMB servers that are members of a workgroup, this server should be made a member as well.
5. Select the appropriate security option for this particular environment from the Security drop down list. The available options include Default, Share Level, User Level, Password Server, Domain and Active Directory.
-
Default or User level is the recommended level using the pre-existing passwords on this server.
-
Password Server directs Samba to contact another SMB server to validate passwords instead of checking its own user list. If this is selected, you will need to provide the address to the authenticating server in the Password Server box.
-
Share level security is rarely used anymore with modern clients
-
Domain and Active Directory security is too broad a topic for this guide. For more information on Domains and AD, see Microsoft's Technet.
Note: Configuring other settings in the Windows Networking Options dialog is optional.
6. Click Save.
Other options on this form:
Other options on this form:
-
If your network already has a WINS protocol server, select Use server in the WINS mode field and enter its IP address. If not, you should choose Be WINS server so that Windows clients can use your system to lookup IP addresses for SMB server names. More recent versions of Windows (and Linux clients) do not need to use WINS, as they can look up server names in the DNS - assuming your network has a DNS server that has entries for all your hosts.
-
To set a description for your system, fill in the Server description field with something like Corporate file server.
-
Normally, Samba will use the first part of your system's DNS name as the SMB server name. To change this, enter something else in the Server name field. Clients will be able to refer to this server by whatever name you specify.
-
To define alternate names that clients can use to refer to your server, fill in the Server aliases field with a space-separate list of names.
-
If you want your system to be the master browser for a network (the server that maintains lists of other SMB servers and clients on the network, as seen in Window's network neighborhood), change the Master browser? field to Yes. If you are running multiple Samba servers on the same subnet, this option should be set for only one. If there are other Windows or Samba servers on the network that want to be master browsers, the one with the highest operating system level will win the 'election' that decides who gets the job. You can increase your system's change of winning by increasing the Master browser priority field - the default of 20 will win against Windows 95 systems, but you would need to enter 65 to beat Windows NT servers.
-
Normally, an SMB server broadcasts information about itself to other servers on the network so that it can be included in browse lists. However, if your network spans multiple subnets then broadcasts from one system may not reach others. To get around this problem, the Remote announce to table can be used to specify the addresses of browser master servers to which this server's IP address and workgroup should be sent. To configure remote announcements on this page, first select the From list option above the table. Then in the IP address field of each row enter the hostname or IP address of a server to announce to, and in the As workgroup field the name of the workgroup that your server should appear under. If the second field is left empty, the servers real workgroup (set in step 2) will be used. To enter more than two remote servers you will need to save and re-open this page so that more empty rows appear in the table.
Now this environment is ready for CIFS sharing.
Managing Security and Access Control in CIFS Share
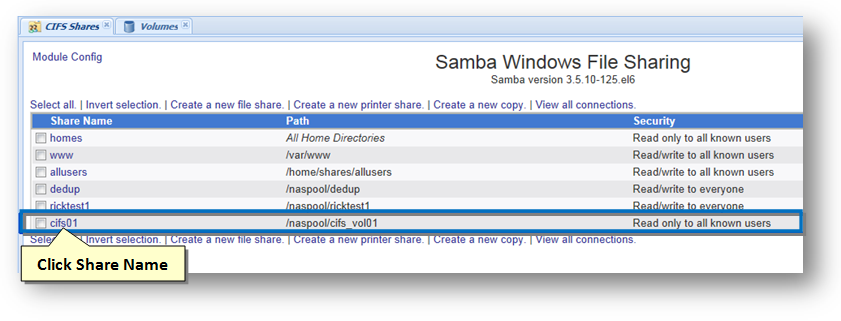
Once a CIFS Share has been created, you can edit various security-related options that control who has access to it and which hosts they can connect from. This can be useful if some shares contain files that only certain people should have access to, or if your Samba server is for use by clients only on your internal network. Normally this is applied “Globally” to address of the CIFS Shares managed by this server but can be set for individual CIFS Shares. To manage individual CIFS Shares, “click” on the appropriate Share Name.1. On the CIFS Shares panel, click the name of the CIFS share link.
The Edit File Share dialog will be displayed. Changing the Security and Access Control settings here will apply only to the specific CIFS Share selected.
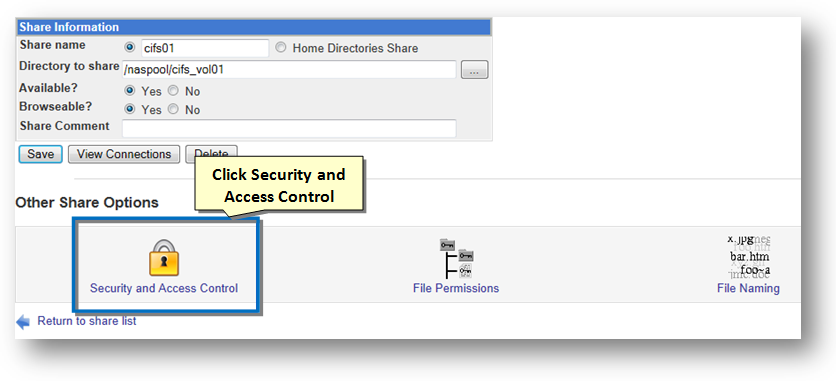
2. To configure and manage security and access control, click the Security and Access Control icon.
The Security and Access Control dialog will be displayed. Choose the settings that best match the particular needs and use case for this share.
The settings shown below allow full read/write access by all users.
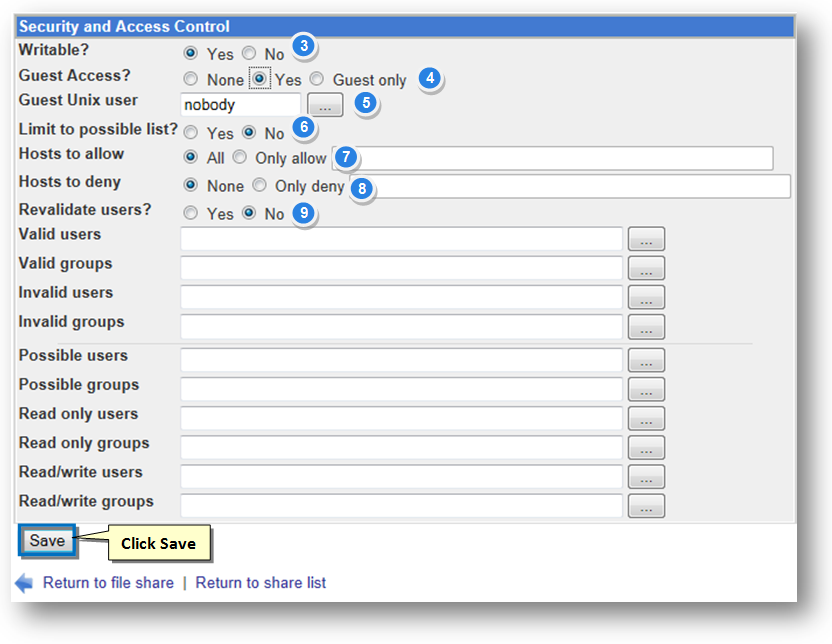
3. Set the Writable field to Yes so that writing is allowed in the files that are shared.
4. Set the Guest Access field to Yes in order to allow guest Unix users read and write access to the files. Set the Guest Unix User to Nobody so that guest Unix users are not allowed to access file sharing.
6. Set the Limit to Possible List to No in order to allow unlimited sharing.
7. Set the Hosts to Allow to Yes in order to allow all hosts access file sharing. You can enter a list of hostnames and IP addresses into the adjacent text box. Partial IPs like 192.168.1. or network addresses like 192.168.1.0/255.255.255.0 can be used to allow an entire network. If your system is an NIS client, you can enter a netgroup name preceded by an @_ (such as _@servers) to allow all of the group's members. If All is selected, all hosts will be granted access, unless you fill in the next field. No matter what you enter, connections from the local host (127.0.0.1) are always allowed unless it is specifically listed in the *Hosts to deny* field.
8. If hosts are specified for Hosts to deny, this setting will block specific hosts from accessing this CIFS Share. To use this option, fill in the Hosts to deny field with a similar list of hostnames, IP addresses, networks or netgroups. If both fields are filled in, Hosts to allow takes precedence. If None is selected, all hosts will be permitted. Typical configurations will use only one of these two options (either Hosts to allow, or Hosts to deny). SoftNAS recommends setting Hosts to deny to None.
9. Set Revalidate Users? to No
10. Click Save.
Additional Options available:
-
To allow only certain users to access this share, fill in the Valid users field with a space separated list of usernames. You can also fill in the Valid groups field with a list of groups whose primary and secondary members will be granted access. Only if both lists are empty will all users be allowed.
-
Alternately, to deny specific users and members of groups, fill in the Invalid users and Invalid groups fields. If a user appears in both the valid and invalid lists then they will be denied access.
-
To restrict some users to read-only access for this share, enter a list of usernames into the Read only users field. You can also enter a list of Unix groups in the Read only groups to restrict their primary members. Everyone else will have full read/write access, assuming that the share is actually writeable and that the Read/write fields have not been filled in.
-
To give only certain users permission to write to the share and restrict everyone else to read only access, enter a list of usernames into the Read/write users field. As usual, the Read/write groups field can be used to enter a list of groups whose primary members will be allowed to write as well. Naturally, normal Unix file permissions that may be prevent writing to files or directories still apply to all users. If a user appears in both the Read only and Read/write lists, he will be allowed to write. The fields in this and the previous step have no effect on printer shares. Instead, all allowed users will be able to print.
The share security permission settings are now configured.
Access for a specific user to a CIFS Share
Samba allows you to specify a one to one relationship between a user and CIFS Share through “Manage Samba Users”.Select Manage Samba Users in order to manage or add new Samba users for this SoftNAS Cloud Server.
To add a user, select Add User and a panel will open to allow you to provide the necessary information.
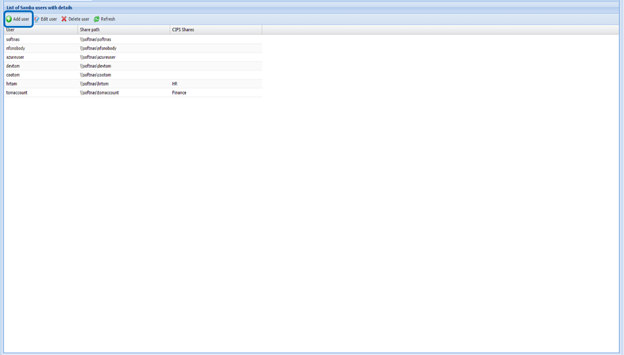
Note: If the user is already listed in the User list, you will need to first delete the user before you can add the specific relationship of the user to a CIFS Share. Edit user only allows for the setting of the password for the user.
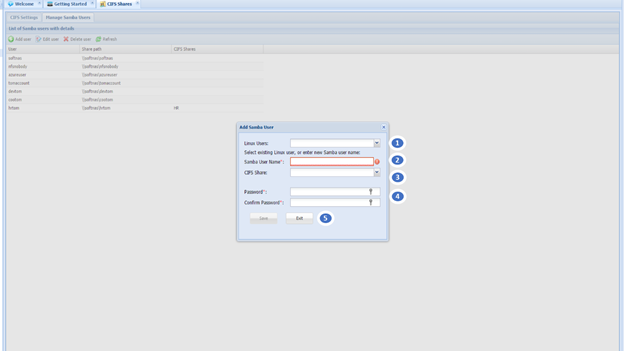
In order to associate and configure a specific user to a specific CIFS Share, you will need to perform the following steps:
-
This is an optional field. Enter the Linux user name if the user already exists on the SoftNAS Cloud Server. This is the name of the user on the SoftNAS Cloud Server. You can search for the user by selecting the “down arrow” next to the field.
-
If the Linux user name was provided, Samba will automatically set the Samba User Name to the same. Otherwise you can enter in a different name to be used.
-
Use the “down arrow” to select a CIFS Share already created.
-
Set up the Samba User’s password and confirm it.
-
Select Save to apply the information to the newly added user.