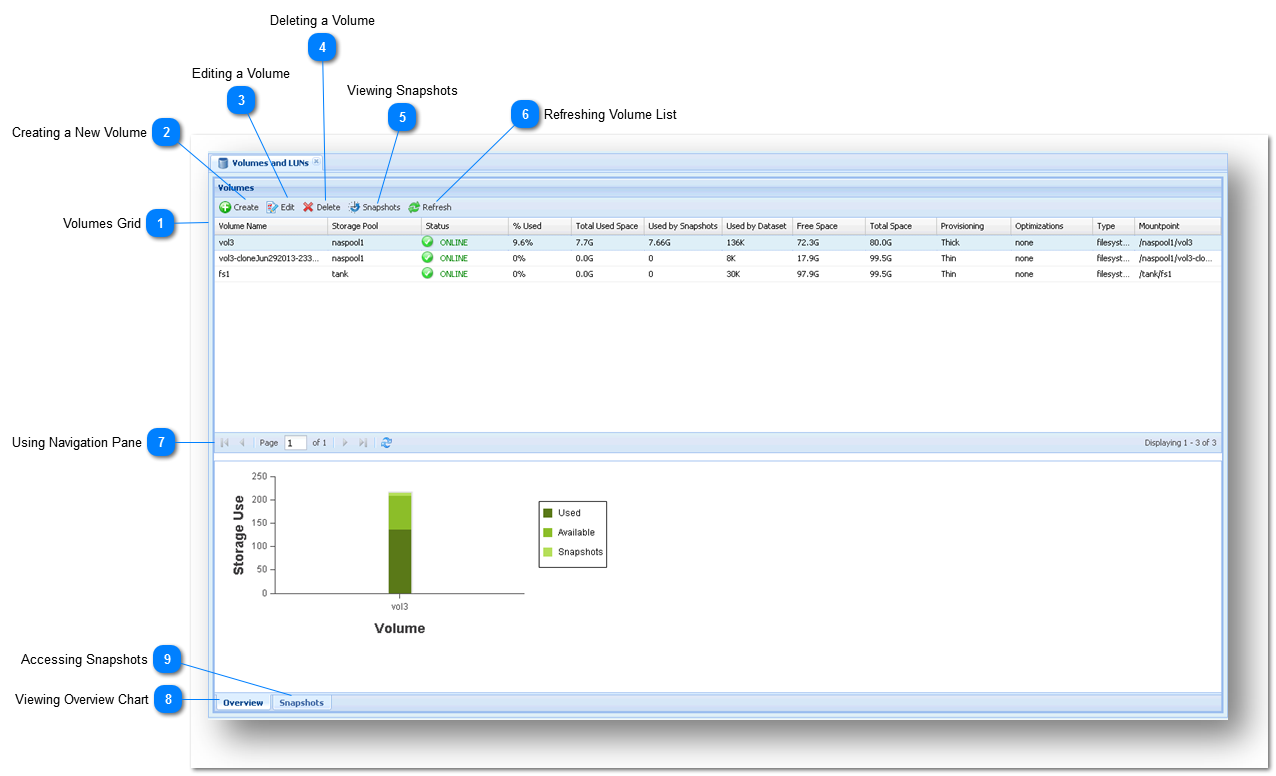
Managing Volumes and LUNs
Volumes provide a way to allocate storage available in a storage pool and share it over the network. The Volumes and LUNs section of SoftNAS allows you to create, edit, remove and manage storage volumes and their snapshots.


 DEGRADED icon -indicates the volume's pool is in a degraded state, continues to process data normally, but is at increased risk and requires attention; e.g., replace a failed disk in a RAID array.
 UNAVAIL or FAILED icon indicates the volume's pool is in a failed state and is not currently processing storage requests. This usually means there are disk failures exceeding RAID protection.
 Creating a New Volume
Creating a volume is very easy. Simply follow the steps given below.
1. To create a new volume, click the Create button in the toolbar.
The Create Volume dialog will be displayed.

2. Enter the name of the volume in the Volume Name text entry box.
3. To select the storage pool where the storage space for the volume has to be reserved, click the Storage Pool button.
The Choose a Storage Pool dialog will be displayed.

A. Select the required storage pool from the list of available storage pools.
B. Click the Select Pool button.
Back in the Create Volume dialog, the name of the selected storage pool will be displayed in the Storage Pool field.
4. Select the type of the volume from the Volume Type section. The available volume types are File System (NFS, CIFS) and Block Device (iSCSI LUN).
Note: If you want to share the volume via iSCSI, then choose Block Device instead of accepting the default File System volume type.
5. One-click Sharing - SoftNAS supports one-click sharing during Volume creation. Choose the appropriate sharing option checkboxes to Export to NFS and/or Share via CIFS, as appropriate.Verify the type of one-click sharing selected. The available options are Export via NFS and Share via CIFS for File System volume type and Share as iSCSI LUN for Block Device volume type.
6. Select the type of the storage provisioning option. The available options include Thin Provision - Dynamically allocate space as it is needed and Thick Provision - Preallocate space from storage pool now.
7. If you select the type of the storage provisioning option as Thick Provision in the previous step, then specify the size of the volume in the Volume Size field and select the size unit.
8. Select the required option for storage optimization in the Storage Optimization Options section. The available options are Compression and Deduplication. The Compression type saves disk space, but requires more of CPU space. The Deduplication type eliminates duplicates, but consumes more memory space.
9. Optionally, you can click the Snapshots tab to configure the same.
Note : Snapshots are enabled on a standard schedule by default whenever a new volume is created.
10. Click the Create button at the end.
The new volume is created and it shared on the network.
|
 Editing a Volume
You can edit any selected volume. To do so, simply follow the steps given below.
1. Select the volume that you wish to edit in the Volumes list.
2. Click the Edit button in the toolbar.

The Edit Volume dialog will be displayed.

Note: You cannot edit the name and type of the volume.
3. Select the type of the storage provisioning option. The available options include Thin Provision - Dynamically allocate space as it is needed and Thick Provision - Preallocate space from storage pool now. By default, volumes are thin-provisioned. Thin-provisioning allows a volume to acquire storage from its Storage Pool on an as-needed basis, as new data is written to the volume. Thin-provisioning enables many volumes to share a storage pool without an upper limit being placed on the volume itself (the only upper limit to the volume's size is available space in the pool). Thick-provisioned volumes reduce the amount of space available in the Storage Pool by reserving this space for use by a specific volume. When a thick-provisioned volume reaches its maximum volume size, no more data can be written and a volume full error will be returned for writes to a full volume. Thick-provisioned volumes can be re-sized at any time to add space (or return space to the storage by by reducing the volume size).
4. If you select the type of the storage provisioning option as Thick Provision in the previous step, then specify the size of the volume in the Volume Size field.
Note: When Think Provision is selected the Volume Size specifies how much space is to be pre-allocated to the volume. Space is determined by entering a Volume Size amount as a floating point value, along with choosing the Size Units. Once a Storage Pool has been selected for a thick-provisioned volume, the amount of available space to allocate is displayed below the Volume Size field, as shown in the example below.
The Volume Size value can be any valid numeric value; e.g., 10, 12.5, 100.0, 1.25
5. The Size Units selector is used to choose the units for the Volume Size.Select the required size unit from the drop down list. The available units include MB – Megabytes, GB - Gigabytes (default) and TB – Terabytes.
6. Select the required option for storage optimization in the Storage Optimization Options section. The available options are Compression and Deduplication.
• The Compression type saves disk space, at the expense of additional CPU overheads for each read and write request (to decode and encode the data). Depending on how compressible the data is, it is common to see data compression rates up to 50% or more.
Note: If you compress a significant amount of data, be sure to observe the amount of actual CPU consumed during a typical day, and if necessary, add more CPU capacity to the SoftNAS VM as required to ensure compression is fast and efficient. If data is not highly-compressible, then disabling compression provides a better performance tradeoff.
• The Deduplication type eliminates duplicates, but consumes more memory space. For certain types of data (e.g., Windows virtual machine images, which are highly-redundant in virtual desktop applications), deduplication can save up to 80% on storage requirements by eliminating duplicate data. Each time a duplicate data block is to be written, a pointer to the existing duplicate block is created instead, along with increasing the duplicate block reference count. To make these operations as fast as possible, a table of deduplicated blocks is maintained. A hash table of deduplicated blocks is kept in memory to make lookups very fast. When a duplicate block is read, it is usually in cache memory and is simply returned with no disk I/O required.
Note: It is recommended to avoid using deduplication unless the data is highly-duplicative, because of the memory impact of deduplication. It is estimated that for every terabyte of deduplicated data managed, one gigabyte of memory is required for the deduplication lookup tables. These tables compete with cache memory, which can reduce the overall performance of SoftNAS.
7. Click the Snapshots tab.
The Snapshots section of the dialog will be displayed.

Volume snapshots are automatically created based upon the chosen schedule. The maximum number of snapshot copies determines when older snapshots are pruned and eliminated.
8. In the Volume Snapshot Configuration section, check the box in order to enable the scheduling of volume snapshots.
9. Select the type of snapshot schedule from the Snapshot Schedule drop down list. The available options include are Default, 24 x 7, MaximumSnapshots and Business.
10. In the Scheduled Snapshot Retention Policy section, set the maximum number of scheduled snapshot copies to maintain in the Hourly, Daily and Weekly fields by either manually entering the value or by using the scroll bar to increase or decrease the value.
Note:
• Hourly snapshots occur on the hour at the hourly times specified in the schedule.
• Daily snapshots occur at 1:00 a.m. each day on the days specified.
• Weekly snapshots occur at 2:00 a.m. once per week on the day of the week specified.
11. Click the Save button.
The changes made to the volume will be updated.
|
 Deleting a Volume
You can delete an ununsed volume. To do so, simply follow steps given below.
1. Select the volume that you wish to delete in the Volumes list.
2. Click the Delete button in the toolbar.

The Delete Confirmation Required dialog will be displayed.

3. Enter the text as “I Approve” in the text entry box.
4. Click the Delete Permanently button.
The selected volume will be removed.
|
 Viewing Snapshots
You can access, view and manage storage snapshots. To do so, click the Snapshots button in the toolbar.
The Snapshots tab will be displayed in the lower part of the Volume panel.
For more information, refer to the Managing Snapshots section.
|

 Using Navigation Pane
You can use the Navigation Pane to navigate between volume records. It has the following set of buttons.
 First Page - Press to navigate to the First page of volumes (when the number of volumes exceeds the number that can be displayed on a single page). First Page - Press to navigate to the First page of volumes (when the number of volumes exceeds the number that can be displayed on a single page).  Previous Page - Press to navigate to the Previous page of volumes (when the number of volumes exceeds the number that can be displayed on a single page). Previous Page - Press to navigate to the Previous page of volumes (when the number of volumes exceeds the number that can be displayed on a single page). Page Number - Displays the current page of volumes (when the number of volumes exceeds the number that can be displayed on a single page). You can also enter the page number in the box to navigate to that page. Page Number - Displays the current page of volumes (when the number of volumes exceeds the number that can be displayed on a single page). You can also enter the page number in the box to navigate to that page.  Next Page - Press to navigate to the Next page of volumes (when the number of volumes exceeds the number that can be displayed on a single page). Next Page - Press to navigate to the Next page of volumes (when the number of volumes exceeds the number that can be displayed on a single page). Last Page - Press to navigate to the Last page of volumes (when the number of volumes exceeds the number that can be displayed on a single page). Last Page - Press to navigate to the Last page of volumes (when the number of volumes exceeds the number that can be displayed on a single page). Refresh Page - Press to update the volumes list with the latest information. Refresh Page - Press to update the volumes list with the latest information. |
 Viewing Overview Chart
You can view the summarized details of volume in the Overview Chart.
1. To do so, simply navigate to the Overview tab in the left corner, at the end of the Volumes panel.
The Volume Usage Chart with a bar chart summarizing storage usage by volume will be displayed.

2. Move the mouse cursor over the top of a volume's bar. You can view the a summary of usage in a tooltip popup window.
3. To view the Overview Chart of a selected volume, click that volume to select it in the Volumes list.
The Overview Chart of the selected volume will be displayed.
|
 Accessing Snapshots
You can access, view and manage storage snapshots. To do so, click the Snapshots tab.
The Snapshots tab will be displayed with the list of all volume snapshots.
For more information, refer to the Managing Snapshots section.
|