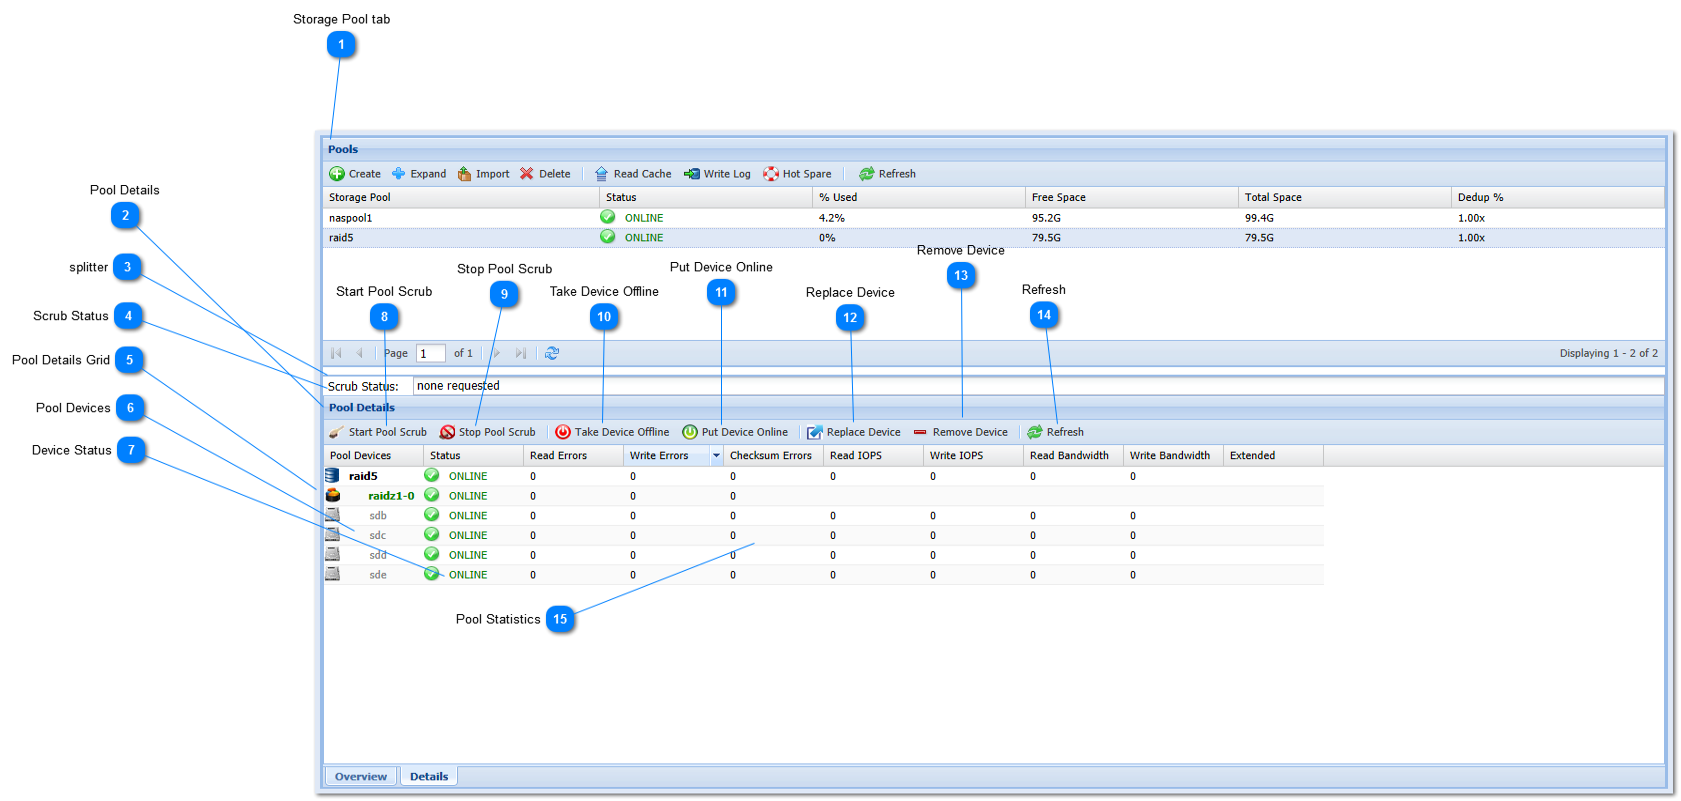
The pool "Details" tab provides detailed information about the storage pool, along with buttons that can be used to control the pool and its devices.
 Storage Pool tab
This is the main Storage Pool tab
|
 Pool Details
The Pool Details are shown in this window.
|
 splitter
Use the window splitter to resize the area between the top and bottom pool windows.
|
 Scrub Status
The Scrub Status window shows the current status of the most recent scrub request (use "Refresh" button to update).
|
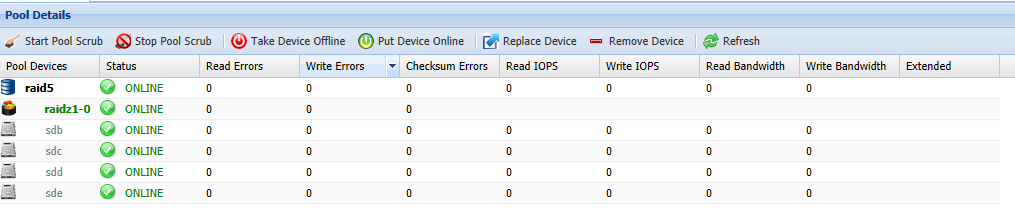
 Pool Details Grid
The Pool Details grid is a table containing the details of the pool, including all of the devices that make up the pool, the RAID configuration, etc. This grid is updated each time the "Refresh" button above the grid is pressed.
|
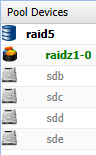
 Pool Devices
The leftmost column shows a list of the devices which make up the storage pool. The devices are shown in their RAID configuration, with disks listed underneath the RAID array grouping. If additional non-data devices (e.g., read cache, write log and hot spares) are present, they will also be shown.
|
 Device Status
This column shows each storage pool device's status.
The following status indicators may be shown depending upon the state of the storage pool.
 ONLINE icon indicates the volume and pool are online, healthy and operating normally.
 DEGRADED icon indicates the volume's pool is in a degraded state, continues to process data normally, but is at increased risk and requires attention; e.g., replace a failed disk in a RAID array.
 UNAVAIL or FAILED icon indicates the volume's pool is in a failed state and is not currently processing storage requests. This usually means there are disk failures exceeding RAID protection.
|
 Start Pool Scrub
This button starts a pool scrub for the selected storage pool. A scrub is an operation which examines the integrity of all data across the entire pool. Any errors or issues in the pool are corrected. Press the "Refresh" button for an update on the scrub operations progress.
Note: Scrub operations on large pools or pools with a large number of small files can take an extended period of time to complete. Please be patient when a scrub (or resilver) operation is in-progress - it will complete eventually, even if it takes several days for extremely large pools.
|
 Stop Pool Scrub
Stop a pool scrub operation that is in progress. It is not normally required to stop a pool scrub operation, as pool scrubs take place as lower-priority, background tasks.
|
 Take Device Offline
Take the selected device offline. Be careful when taking devices offline in an active, production storage pool, as it could potentially cause the pool to become unavailable, or at a minimum degrade the pool's ability to recover from an actual device failure. Taking devices offline should only be required if a device requires maintenance, which should be rare.
Note: If a device is taken offline for a period of time, it will require "resilvering" to rebuild its integrity with the data changes that have occurred while it was offline.
|
 Put Device Online
Use this button to put a device online, by first selecting the device, then pressing this button.
|
 Replace Device
Replacing a device is usually done when a device has failed. To replace a device, select the device in the Pool Details Grid list, then press the Replace Device button. The selected device will be replaced by the Spare device (you must have a spare device available - the next available spare will be used if there are multiple spares).
|
 Remove Device
A device can be removed from the pool. To remove a device, select the device in the Pool Details Grid list, then press the Remove Device button. Use appropriate care when removing devices from an active pool, as it could degrade or fail the storage pool and cause data loss if the pool is unable to tolerate the device being removed. To replace a failed device, it is recommended to use the "Replace Device" command to replace a bad device with a hot spare.
|
 Refresh
The Refresh button causes the latest storage information to be displayed in the Pool Details Grid list and Scrub Status is updated.
|
 Pool Statistics
There are a number of useful pool and device statistics available. To view the latest information, press the "Refresh" button. Each time the Refresh button is pressed, a sampling of the latest statistics are taken and displayed (these are instantaneous values, not accumulated).
Read Errors - the number of read errors during the last refresh period
Write Errors - the number of write errors during the last refresh period
Checksum Errors - the number of checksum errors detected
Read IOPS - the number read I/O operations on the device
Write IOPS - the number of write I/O operations
Read Bandwidth - the read bandwidth from the device
Write Bandwidth - the write bandwidth to the device
Extended - additional information (if any) that may be available for a device
|
|