iSCSI Target and LUN Configuration
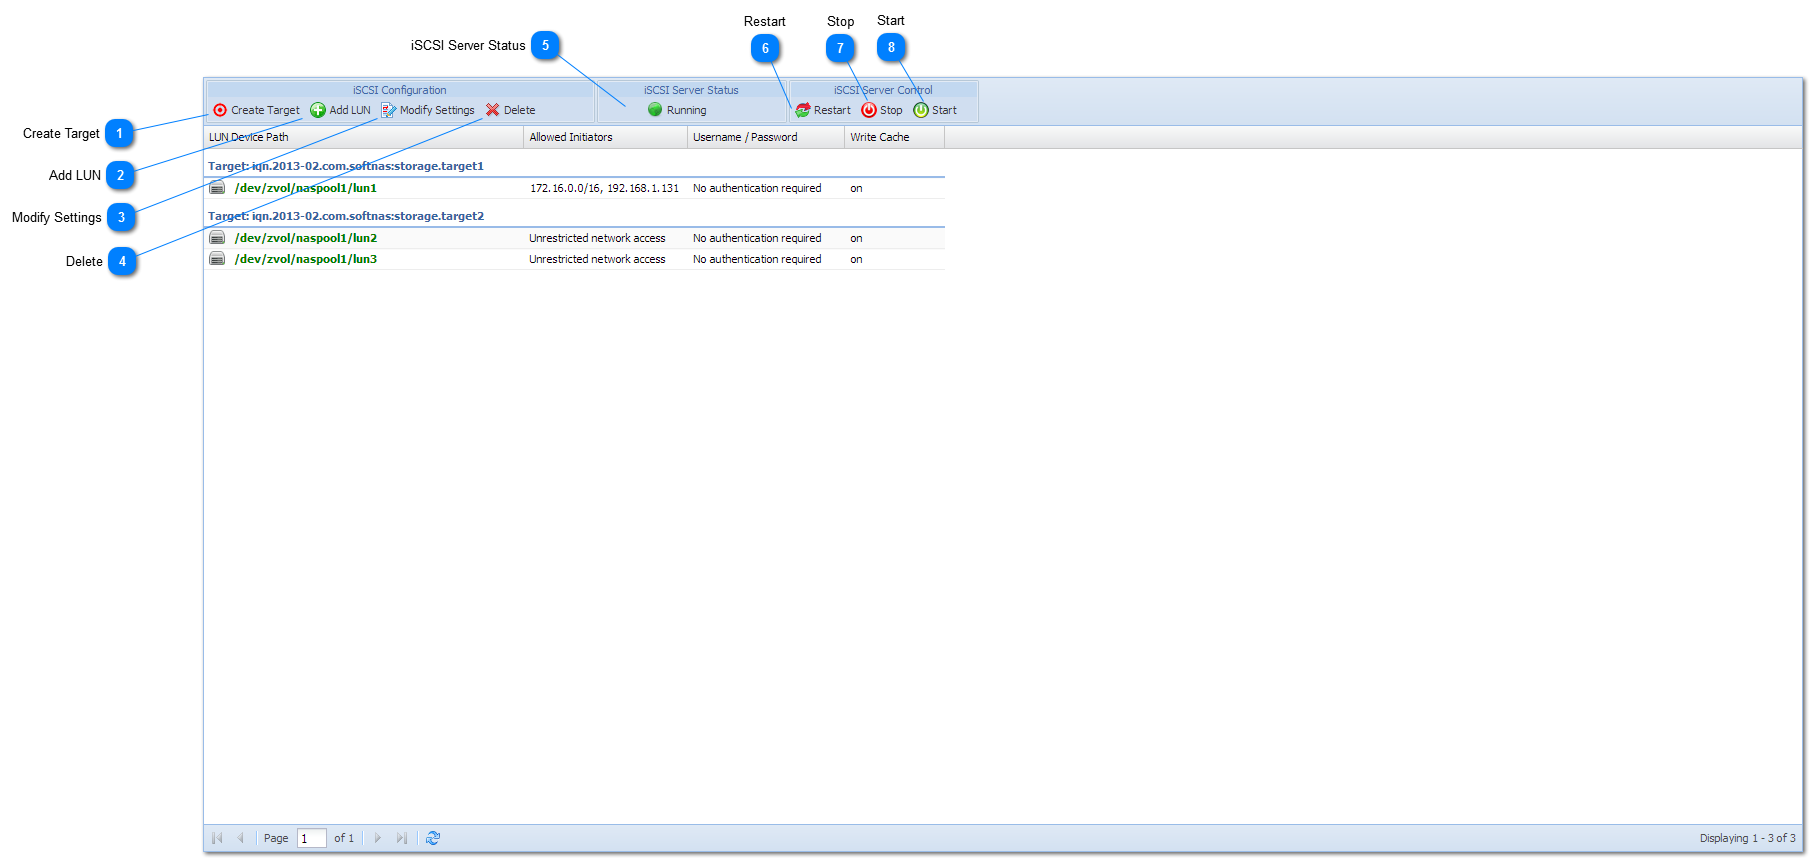
 Create Target
Creates a new, empty iSCSI target. The target can then be populated with LUNs, which are associated with block device storage volumes that will be shared via iSCSI. A target can have any number of LUNs attached to it. All LUNs associated with the target inherit the target's configuration settings.
|
|
 Add LUN
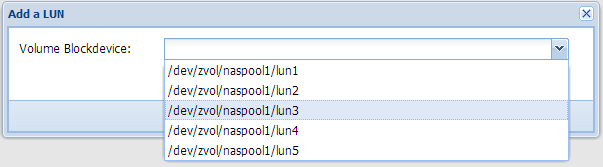
To add a new LUN, first select the target (by clicking on an existing LUN or the "EMPTY TARGET" area), then press this "Add LUN" button.
Double-clicking on the "EMPTY TARGET" area will also allow selection of a new LUN.
After pressing Add LUN or double-clicking the empty target, the following dialog will appear:
Using the "Volume Blockdevice" drop-down box, select a blockdevice associated with a Volume to associate with the new LUN, then press the Save button to complete LUN creation.
NOTE: Be sure to restart the iSCSI Server for new LUN additions to become active and available on the network to iSCSI initiators.
|
|
 Modify Settings
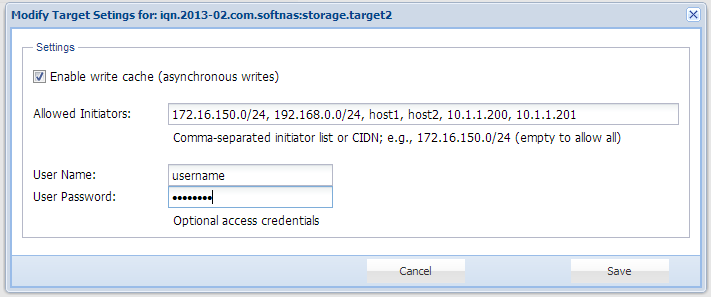
To modify a target's settings, select a target / LUN and press the Modify Settings button.
The Modify Settings dialog appears:
As shown above, the following settings are available:
-
Enable write cache (asynchronous writes): enabled by default, this option causes iSCSI write operations to be cached temporarily so the iSCSI request can be immediately satisfied, for increased performance. The disk block will be written to disk as time permits. Use of this option improves performance, but can cause a potential loss of data in the event of a power failure (always use a UPS with your storage server host running SoftNAS).
-
Allowed Initiators: if empty, initiator connections from any IP address is allowed. You can specify one or more comma-separated IP addresses, DNS names and/or CIDN-style IP address ranges to allow one or more subnets access.
NOTE: As with any other iSCSI configuration change, to place changes online the iSCSI Server must be stopped and started (restarted).
|
|
 Delete
The Delete button will delete the currently selected LUN. If there is no LUN associated with the target (an "empty LUN"), then the delete button will delete the target.
|
|
 iSCSI Server Status
This status indicator shows the current status of the iSCSI Server - "Running" or "Not Runnng". Double-click the icon to restart the server.
The current iSCSI status is updated every 5 seconds to reflect the current server status (and immediately after a server control command).
|
|
 Restart
s the iSCSI Server service. A "restart" temporarily interrupts the existing iSCSI connections (if any) established between iSCSI initiator clients and the iSCSI Server, performing a forced restart operation. Alternatively, if there are no established iSCSI connections, you can use Stop followed by Start.
When the iSCSI Server is restarted, it applies the latest configuration information from the /etc/tgt/targets.conf file (where the configuration changes are stored for targets, LUNS and other settings).
|
|
 Stop
Stops the iSCSI Server, if there are no active iSCSI connections. If there are active iSCSI connections, an error message is shown and the stop operation is ignored.
|
|
 Start
The Start button starts the iSCSI Server when it is not running.
|
|